As you may have heard, we’re working at least once a week on the window display project. On Mondays at 7:30pm we meet at the space for this. Here’s how it works:

This is what charlieplexing looks like. If you turn pins A,and H on, and also turn on pins 1 and 8, you’ll have the top left LED turn on blue, the top right LED turn on blue, and the bottom left LED turn on green, and the bottom right LED turn on green as well. you can control all of these LEDs in this manner, and automate it with a Rainbowduino.
If you feel comfortable and you’re in the space, please start wiring LEDs together, since we’ll need a bunch.
The conventions we’ve established are red wires for red, green for green, black for blue, and white for power. Each wire should be 3.5″ long. Solder two wires to each colored lead, and one white wire to the long lead. The color of the LED leads are white/power for the long lead, and red is the shorter single one by it self to the one side of the long lead, and green and blue are on the other side of the long lead. From left to right, it’s: Red/Power/Green/Blue, with the power being the long lead.
If you feel comfortable and you’re in the space, please start wiring LEDs together, since we’ll need a bunch.
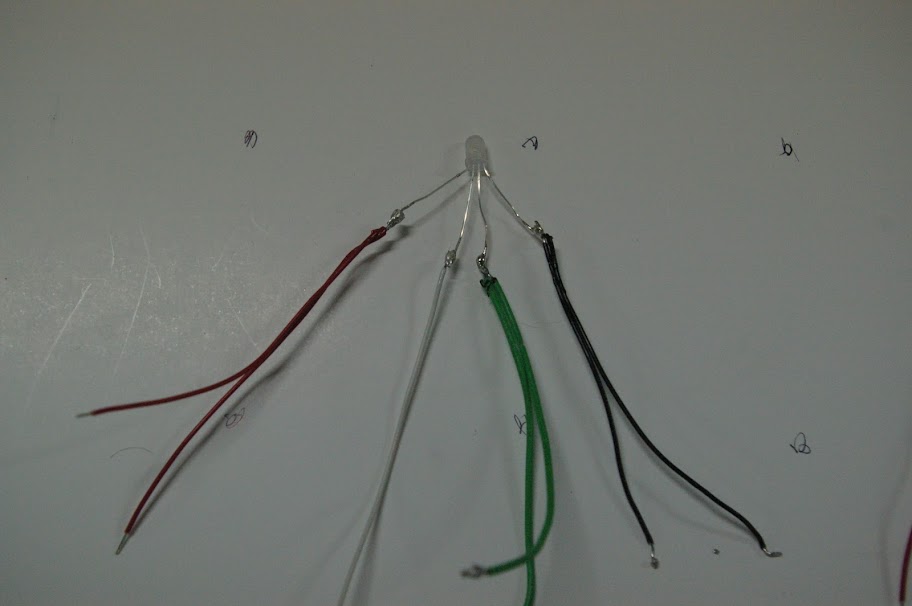
When you do the second one, attach a set of red, green and blue wires from the first LED to the second LED.
It should start to look like this:

You need 8 LEDs wired together like that, with two reds going to each red lead, two greens to each green lead, and two blues to each blue. Whites go the other direction.
Once we finish 8 sets of 8, we’ll connect up the whites from each column to the next, and a set of 64 lights will go into a box like this, and be displayed up in the window. We need 16 sets of 8 sets of 8 to fill both windows, all the way across. The resulting display will be a 64×8 pixel display.


